Disclaimer: Please use this guide at your own risk. We try to provide the most accurate and up-to-date information. Please consult with a plumbing engineer or the Israeli Standards Institute to verify the information. In addition, if there is information you cannot find here please let us know and we will try to update the page.
BATHTUB:
TOILET:
SHOWER:
SINK: bear in mind that the height and style of the sink determines the placement of the water and drain points. A deeper, apron sink will require setting the drain line lower. Too low, however, and the under-sink trap will look like an eyesore.
KITCHEN SINK:
WASHING MACHINE:
PIPE SIZING: Proper pipe sizing is absolutely critical in maintaining proper, unfluctuating flow. You know that uncomfortable feeling. You are enjoying a nice shower when all of a sudden there is a surge in scalding water or a sudden moment of freezing cold water. Most probably one of two things occurred: either the piping is undersized or a faucet without a flow-inhibitor was opened to max capacity.
PEX piping (hot and cold supply):
- Height of bathtub= 40-60 cm.
- Height of Israeli-style wall-mounted faucet = 15-20 cm above edge
TOILET:
- Height of rim (not seat): 39 cm +/- 1 cm. Handicap toilet will be around 5 centimeters higher. Kids toilet is 35 cm +/ - 1 cm
- Placement of toilet: 80 cm width on center. In other words, from the center of the toilet to a wall, shower or sink must be a minimum of 40 cm. This is the bare minimum so 90 cm will feel much more spacious. (Bear in mind the toilet needs to be centered. If there is 30 cm on one side and 50 cm on the other side this presents an issue.) From the front of the toilet to the wall: 75 cm minimum.
- Center of 4” drain from floor: 19 cm
SHOWER:
- Mixer valve height: 110 cm is the typical height though code requires placing the valve between 90-115 cm.
- Set shower head height: 210 cm (although code specifies 200 cm minimum).
- Rain shower head height: 220 cm. The reason the rain shower needs to be higher is that often a rain shower head is far larger, comes out further, and then comes out lower on the extension piece. The typical gym-type shower head comes right off the wall with a 45 degree extension and so is barely lowered. The rain shower head can actually be 10 cm lower with the extension piece, and part of the effect, so you don’t also feel claustrophobic, is for the rain shower head to be high enough to get that rain feel.
SINK: bear in mind that the height and style of the sink determines the placement of the water and drain points. A deeper, apron sink will require setting the drain line lower. Too low, however, and the under-sink trap will look like an eyesore.
- Water points: 60-65 cm
- Drain: 55-60 cm
- Height of sink: 80 cm. For a kids-only sink it can be placed lower and for a sink in the en-suite it can be placed higher. It’s important to remember that heights are recommendations. In the end, it is up to the homeowner to decide what heights are comfortable.
- Kids between 3-6 years: 55-60 centimeters
- Kids between 6-12 years old: 65-75 centimeters
- Teenagers to adults: 80-85 centimeters
KITCHEN SINK:
- Height of sink/counter: 85-90 cm
- Water points: 60-65 cm
- Floor drain: 10/16 = 10 cm from wall, 16 cm off center.
- Make sure that drain and cleanout point is within the cabinet, don’t get too close to the dividing walls. In addition, ensure that an access hole is cut out of the cabinet above the drain access. It’s important that a plumber has quick access to clear clogs in the future. Otherwise the cost and inconvenience will go up if he needs to locate it.
WASHING MACHINE:
- Cold water supply: 55 cm according to code although the valve should be placed in an easily accessible location so it can be turned off without moving the machine. Hot water is only necessary for American machines (European machines heat their own water).
- Drain: 60 cm minimum.
- Hot water on the bottom, further out, 40-45 centimeters off floor (advisable. According to code 30 cm is the minimum distance from the concrete floor until the manifold.)
- Cold water on top, closer to the wall, 60-65 centimeters off floor
- Allowing room above floor and between the two manifolds allows easier maintenance of piping in the future. The sleeves should be cut beneath the height of the lowest water point. This way, if there is a leak in the pipe it will be more easily identified as the water will pour out of the sleeve by the manifold.
PIPE SIZING: Proper pipe sizing is absolutely critical in maintaining proper, unfluctuating flow. You know that uncomfortable feeling. You are enjoying a nice shower when all of a sudden there is a surge in scalding water or a sudden moment of freezing cold water. Most probably one of two things occurred: either the piping is undersized or a faucet without a flow-inhibitor was opened to max capacity.
- 1 point: 16 mm
- 2-3 points: 20 mm
- 4-9 points: 25 mm
- 10-15 points: 32 mm
- Keep in mind that hot water is generally used in the middle or ⅔ of the way so two showers may be closer to 1 point.
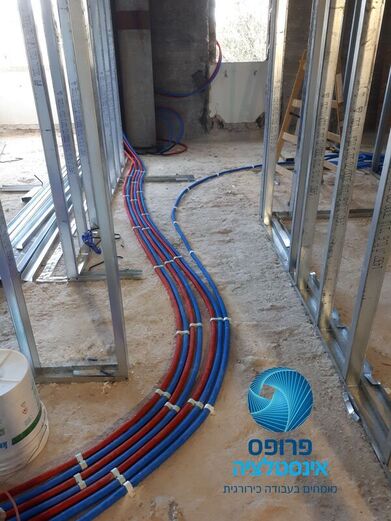
PEX piping (hot and cold supply):
- Continual pipe from the distribution manifold (מחלק מים) until the point of use. Absolutely no connections are allowed inside the floor.
- The piping must be in one continual sleeve. The point of sleeved pex piping is that it can be easily pulled through the sleeve and replaced without any need to break the floor or walls. If installed properly a typical pipe can be replaced within half an hour start to finish. This is also why absolutely no connections along the way are permitted.
- Any change in direction must be done gradually, no tight radius. For instance, it is generally not possible to run the pipe from the floor to the wall straight up without bending the pipe too much. In order to keep the proper radius (the external diameter of the pipe sleeve multiplied by 8) it is usually best to go from the floor to the wall in the form of an S.
- The sleeve of the pipe must run fully into the plastic housing.
- Ensure during and after installation that absolutely no debris enters the sleeve. Even small debris can make pulling a new pipe difficult if not impossible. It is advisable to tape around the end of the sleeve (by the manifold or by a mixer valve) to prevent construction debris from entering. Even if the plumber is careful the rest of the crew will not.
- The piping should be anchored to the ground with proper anchors and preferably covered in cement to protect the piping from the rest of the construction crew. The piping should not be anchored with metal ties as these are often tied too tightly thus squeezing the pipe sleeve and making it difficult if not impossible to pull a new pipe through. There are special plastic anchors that are designed to hold and not deform the form of the sleeve.
SEWER PIPING:
- Requires 1.5%-2% slope (1.5-2 cm drop for every meter)
- In general, depending upon piping material, 4” horizontal piping requires anchors every meter (referring to piping anchored to a ceiling or wall, not buried in the floor):
- 4” vertical piping requires anchors at least every 3 meters.
- For smaller diameter piping anchors are required more frequently. Otherwise, over time, the piping will bend and separate from the connections.
- Keep in mind maximum weight when factoring in anchor strength. Factor in a full pipe full of water, maximum capacity, event of clog -- not simply the nominal weight of regular flowing sewage.
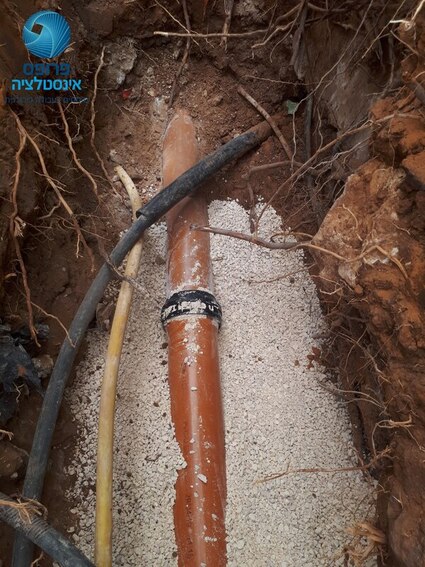
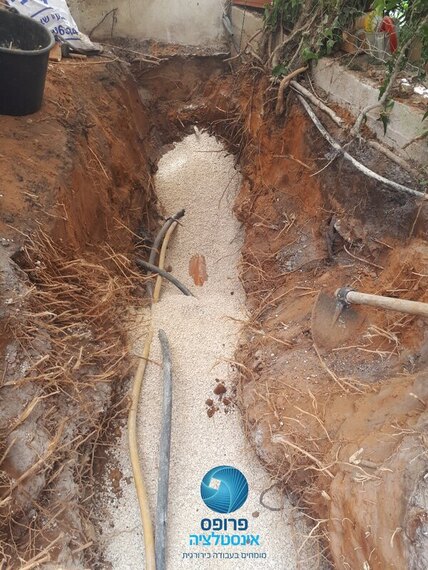
- In-ground piping requires proper bedding -- below, around and above the pipe
- Proper bedding prevents:
- Vertical stressors from deforming the pipe (ovular deformities)
- Rocks from deforming the pipe
- Pipe from sagging/ breaking connections, reverse slope
- Proper bedding prevents:
- Bedding should ideally be made of small aggregate (סומסום) though sea sand can also work
- Bedding should be packed down 15 centimeters below the piping
- Bedding should be packed around the piping as well
- Bedding should be packed down 15 centimeters above the piping
- Proper bedding is critical when working at deeper depths, less so for shallow piping
- Run tape 10 centimeters above piping so diggers in the future don’t hit the pipe
- Make sure to use the proper pipe material!!! Polypropylene (PP) piping should NOT be used for underground application. Neither the straight sections of piping nor the connections. In Israel PP piping is often grey. Either a HDPE piping with the appropriate SDR should be used or PVC piping. The latter is generally orange in color and thicker than the grey PP piping. Improper piping can lead to serious issues such as root infiltration and crushed piping.
|
|
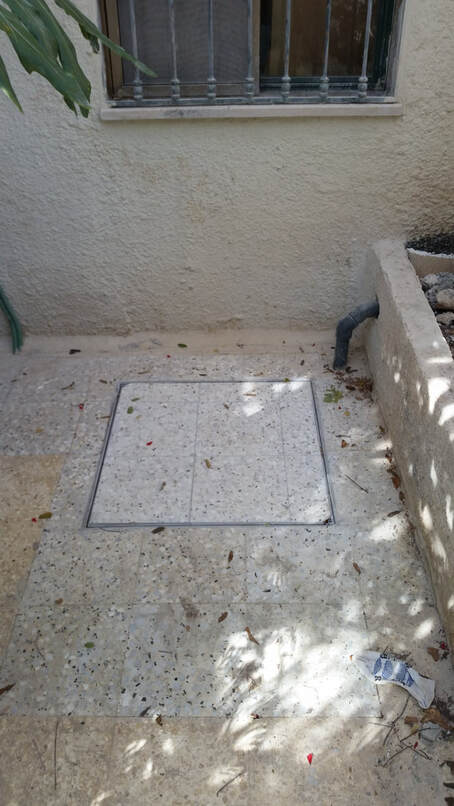
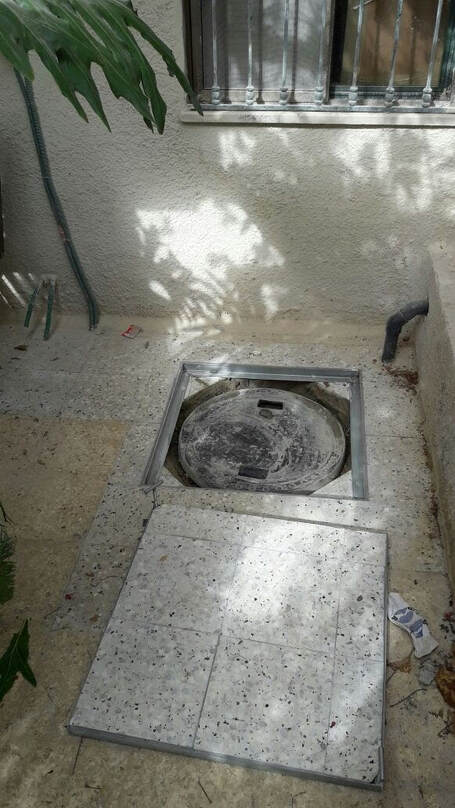
SEWER MANHOLES:
- It is extremely important to have easy access to the sewer manholes. All too often when installing a new patio the crew will cover over one or more manholes (either due to carelessness or due to malice). One guy told a buddy of ours: but you have another manhole over there! That is absolutely not how it works.
- When building a patio over a manhole do not cover it will a tile and mark the tile. That does not allow for easy access. Accessing the sewer in an emergency clog can add hours and lots of money to the job when the plumber needs to come back with a jackhammer. An additional cover should be installed, one that can be easily removed and is wider than the sewer cover beneath. This does not replace the sewer cover but rather is in addition. Also, all too often these covers are not properly custom made. They should be made of material that will not fuse together over time.
|
|
TERMINOLOGY: It is absolutely critical to understand these basic concepts in order to properly diagnose issues.
Static pressure -- לחץ סטטי -- The measured pressure in the piping when the system is stable, non-dynamic, maximum pressure. Measured by using a manometer. In order to get an accurate reading all faucets must be completely closed in the abode (aka no flowing water).
Clearly, the diameter of the piping or the position of valves (fully open or almost closed) plays no role in the static pressure -- only in dynamic pressure. For some reason many people misunderstand this. One mistake people make: there is extremely high pressure (which can be deleterious to the system) so they partially close the main water valve. This in no way influences the static pressure; it only reduces the flow rate (see below).
Dynamic pressure + flow rate -- לחץ דינמי + ספיקה -- The dynamic pressure -- the pressure in the system when water is flowing, will be lower than the static pressure. When clients speak of “pressure issues” in the house we need to determine if the issue is a function of low static pressure or due to low flow rate. All they can sense is low dynamic pressure -- they have no idea what the static pressure is.
- First thing to test, then, is the static pressure. Water company must supply 1.5-6 bar up to the building (keep in mind the pressure may be lower at the top apartment but this is not their concern).
- If pressure is low - 1.5 and below -- solution can be to install a pressure booster -- משאבת מגביר לחץ -- to increase the pressure in the system.
- If pressure is OK, the next step is to determine if the issue is local or system-wide. If systemic: look for small diameter piping, obstructions in the main piping, clogged filter, defective pressure reducing valve. IF THERE IS A PRESSURE REDUCER -- מקטין לחץ -- AND THE ISSUE IS GLOBAL (whole house), NOT LOCAL (specific fixture) ALWAYS CHECK THAT OUT FIRST!!!
If the issue is local, meaning one or two faucets, check for an issue closer to the faucet: - Possible issues: rust in the hot or cold flex tubing to the faucet
- Rust caught in the mechanism of the faucet
- Rust caught in the angle stop or faulty angle stop
- Rust caused by steel or steel to brass connections
